The Foundation
Shari — Sushi Rice
The fish gets the attention, but Shari is the craft. A piece of extraordinary Otoro placed on mediocre rice is still mediocre sushi. The rice must be correct — firm enough to hold shape, springy enough to yield gently when bitten, seasoned so that it enhances rather than competes.
Wash the rice thoroughly
Rinse short-grain Japanese rice (not long-grain, not arborio) under cold water, working it gently with your hand, until the water runs nearly clear — three to five changes. This removes excess surface starch that makes rice gluey rather than springy. Drain well and let it rest for 30 minutes before cooking.
Cook with slightly less water than usual
Cook the rice the way you normally would — rice cooker, Donabe, or a heavy pot — but with slightly less water. If using a rice cooker, fill to the 2-cup mark then reduce by about 2–3mm below that line. The rice needs to be slightly firmer than usual because it will absorb the Sushizu after cooking. If cooked too soft, the seasoned rice becomes paste. Bring to a boil, reduce to the lowest heat, cover and cook 12 minutes. Rest covered for 10 minutes off heat. Do not lift the lid during cooking or the rest period.
Prepare the Sushizu
For 2 cups of dry rice, approximately 60ml of Sushizu is a good baseline — taste and adjust to your preference. To make it from scratch, combine rice vinegar, sugar, and salt in a rough 5:1:0.5 ratio by volume and warm gently until dissolved. Alternatively, use the prepared Sushizu in the Sashimi DC Home Sushi Kit and add to taste.
Ratio note: Different regions of Japan use different Sushizu ratios — Tokyo-style is sharper (more vinegar), Osaka-style is milder and slightly sweeter. Adjust to taste, but avoid over-sweetening. The rice should taste seasoned, not sugary.
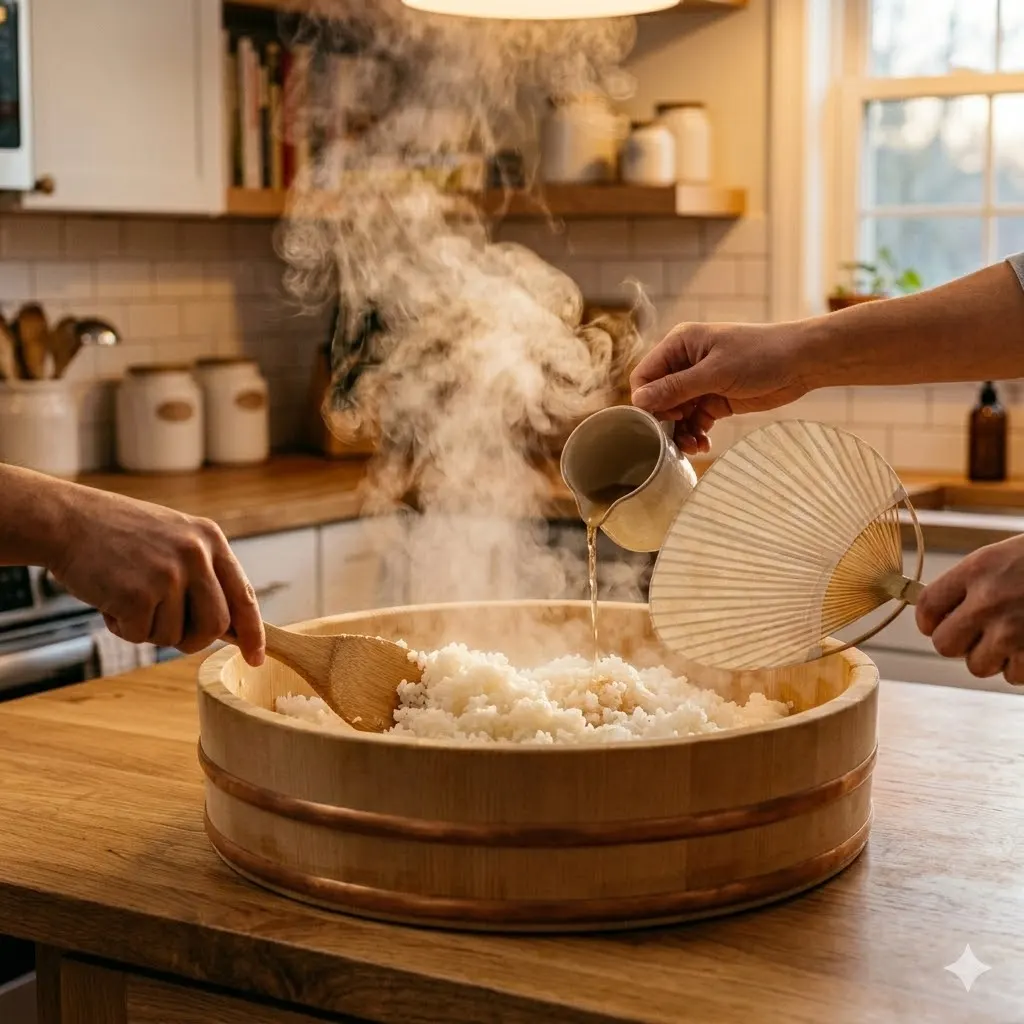
Fold — do not stir
Turn the hot rice into a Hangiri (a wide, shallow wooden tub) or the widest bowl you have. Pour the Sushizu over the rice and immediately begin folding with a flat rice paddle or wooden spoon using cutting strokes — the paddle cuts vertically through the rice rather than stirring in circles. Circular stirring breaks the grains and creates starch paste.
- Fan the rice while folding to evaporate moisture rapidly
- The goal is rice that is glossy, lightly sticky, and at body temperature
- If using a wooden Hangiri, it will absorb excess moisture — an important function
- Cover with a damp cloth until ready to use. Do not refrigerate.
The Critical Skill
How to slice sashimi-grade fish
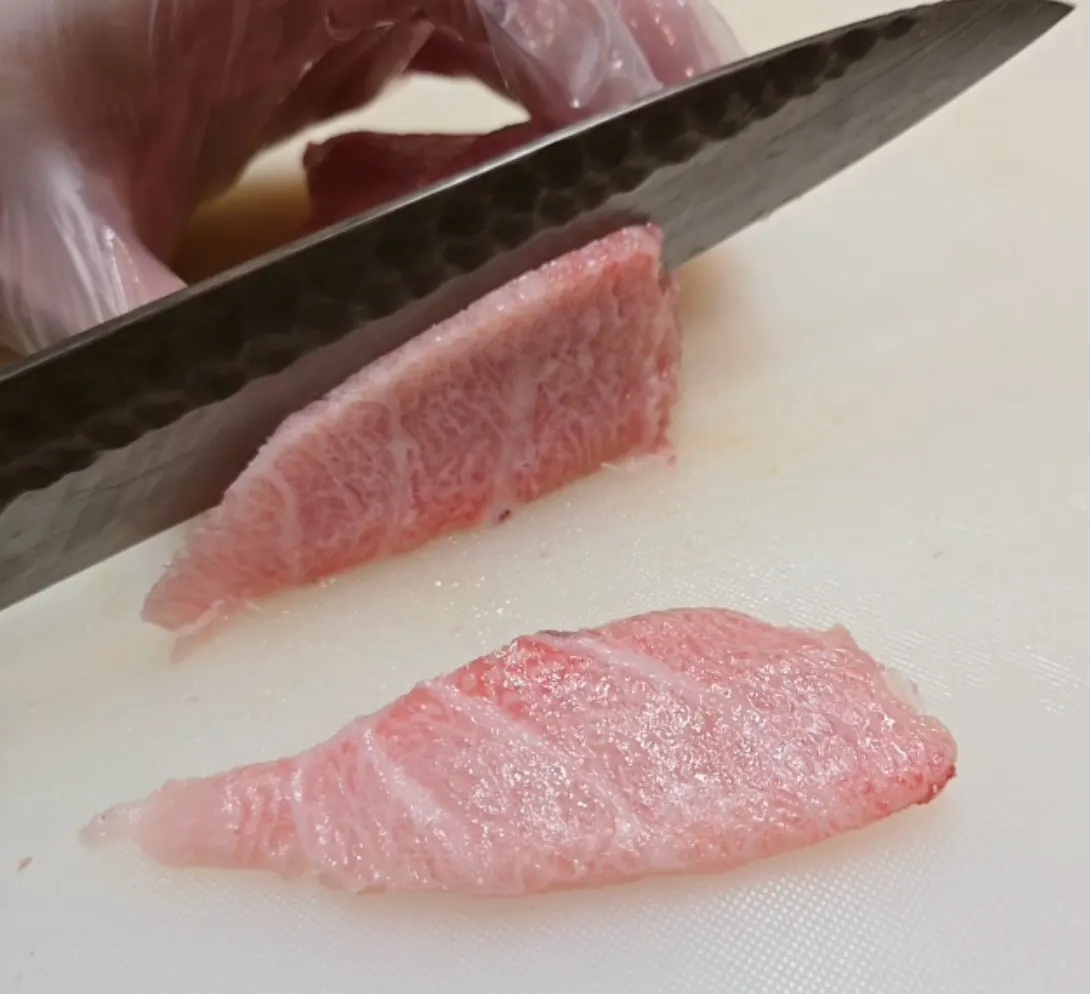
A dull knife does more damage to sashimi-grade fish than any other mistake. The cells of the muscle fiber must be separated, not crushed. A sharp blade gliding through the fish cleanly preserves the cellular structure — the texture and mouthfeel you paid for. A dull blade tears it apart. If your knife is not sharp, sharpen it before slicing.
Choose the right knife
A Yanagiba — the long, single-bevel Japanese sashimi knife — is the ideal tool. Its asymmetric bevel is designed for a single drawing cut that separates cells cleanly. A sharp, long (24cm+) Western chef's knife is an acceptable substitute. What matters most is sharpness. A short or serrated knife will not work. If your knife is not long enough to complete the slice in a single stroke, that is fine — use multiple strokes, but always pull in one direction only. Do not saw back and forth.
Identify the grain — cut against it
Look at the muscle fibers in your saku block. They run along the length of the fish. Cut perpendicular to the grain — across the fibers, not along them. Cutting with the grain produces long, chewy, stringy pieces. Cutting against the grain yields clean, tender slices that yield on the palate.
Hira-zukuri for nigiri and standard sashimi
The most common slicing style. Hold the knife at a slight angle — roughly 10 to 15 degrees from vertical, tilted away from you. Pull the knife toward you in a single smooth drawing motion, using the full length of the blade. Do not push, chop, or saw. One clean pull. If your knife is not long enough to complete the slice in one stroke, you can use multiple strokes — but always in one direction only. Do not saw back and forth; pull in one direction, lift, reposition, and pull again.
- For nigiri: 7–8mm thickness, cut at a slight angle
- For sashimi: 10–12mm, slightly thicker
- For Otoro / Jabara: up to 10–12mm — the fat architecture benefits from substance
One motion, one cut. Hesitation in the middle of the stroke causes the blade to drag and compress the fish. Commit to the cut and follow through cleanly.
Knife angle by cut type
| Cut | Thickness | Angle | Notes |
|---|---|---|---|
| Akami | 10–12mm | 10–15° from vertical | Vivid ruby; cut clean to show color |
| Chutoro | 8–10mm | 10–15° | Fat visible in marbling pattern |
| Otoro | 8–10mm | 15–20° | Slightly wider angle helps with fat content |
| Jabara | 10–12mm | 15° | Respect the accordion structure; don't slice too thin |
| Salmon | 8–10mm | 30–45° (sogi-zukuri) | Angled cut produces larger surface area |
| Scallop (Hotate) | 5–7mm | Horizontal, flat cut | Hold gently; scallop muscle tears easily |
Temperature matters — slice cold
Always slice from refrigerator temperature (1–2°C). Cold fish firms slightly and the blade passes through cleanly. As Otoro and other fatty cuts warm toward room temperature, the fat softens and becomes more difficult to slice without the piece losing its shape. Take the saku from the refrigerator, slice immediately, then let the slices come to room temperature on the plate for 2–3 minutes before eating — especially for fatty cuts like Otoro, where cold suppresses the melt and the flavor.
The Assembly
Temaki — hand rolls

Temaki (手巻き) is the most forgiving form of home sushi and one of the most enjoyable to eat. Each person rolls their own at the table, immediately before eating — the Nori stays crisp, the rice is warm, and the fish is presented exactly as sliced. There is no machinery, no special mat, no compression. Cut Nori into quarters — a quarter sheet is the right size for a single casual Temaki and easy to handle. You need one quarter-sheet of Nori, a small spoonful of Shari, and something worth wrapping.
Set up the table — serve immediately
Arrange sliced fish on a cold plate. Keep Shari warm in its Hangiri under a damp cloth. Cut Nori into quarters just before serving — a quarter sheet is the right size for one casual Temaki. Pre-cut sheets soften quickly, so cut only as you go. Have small dishes of tamari (or Shoyu), real wasabi, and pickled ginger ready.
The Nori rule: Once you add rice to Nori, you have approximately 30 seconds before it begins to soften. Roll and eat immediately. This is not a dish to be assembled ahead and plated.
Hold the Nori and place rice
Hold a quarter-sheet of Nori in your non-dominant hand, rough (matte) side up. With damp fingers, place a small amount of Shari on the left half of the sheet. There is no need to carefully spread it — just set it down casually. A small amount of wasabi on the rice is traditional but optional.
Add fish — do not overfill
Lay 1–2 slices of fish on the rice. With a quarter sheet, this is the right amount — casual, uncluttered, where the fish and rice can actually be tasted together. The restraint is the point.
Fold into a cone and eat
Fold the Nori around the rice and fish into a casual cone — there is no strict technique required. Wrap loosely and eat immediately. The point of Temaki is spontaneity and the crispness of the Nori in the first bite. Do not set it down.
- Dip the tip lightly in tamari — not the rice, just the fish
- Eat in two or three bites, not one
- Roll each piece to order, never in advance
Equipment & Supplies
What you actually need
A home sushi setup does not require expensive equipment. The non-negotiables are a sharp knife and genuine sashimi-grade fish. Everything else helps but can be improvised.
Non-negotiable
- Sashimi-grade fish — from a source with genuine provenance, Ikejime processing, and an unbroken cold chain
- Sharp, long knife — Yanagiba ideal; a sharp chef's knife is acceptable
- Japanese short-grain rice — not long-grain, not converted, not parboiled
- Sushizu — make your own or use the Sashimi DC kit version
- Nori — fresh, sealed; softened Nori ruins Temaki
Helpful but not required
- Hangiri — can substitute a wide, non-reactive bowl
- Uchiwa fan — any flat object that moves air will work
- Real wasabi — good wasabi paste is an acceptable substitute
- Tamari or aged Shoyu — higher quality Shoyu than standard soy sauce
Ready-made
The Sashimi DC Home Sushi Kit — $50
Premium Japanese short-grain rice, prepared Sushizu, Shoyu, real wasabi, and Nori. Everything you need alongside the fish. Pickup or delivery.